Prosciutto Wraps!

IMG_20150823_195113

After a long summer, I’m headed back to my second year of grad school.  One of the best things about summer has been having the time to garden and cook!  Now that the crush of the school year is upon us again, I’ll be making a lot of these quick, easy wraps.  These prosciutto wraps are yummy, surprisingly filling, and so quick to make!  With the ingredients on hand, I can make them in less than five minutes.  Served with fresh figs and homemade refrigerator pickles, it’s the perfect summer meal.

Ingredients: (Serves 1)

2 Strips of prosciutto (Trader Joe’s sells a SCD and Paleo friendly brand)

Prepared Mustard to taste

2 pickles

2 slices of SCD legal cheese

1/4 of a small avocado cut in slices

A handful of lettuce

Directions:

1.) Spread mustard on the slices of prosciutto.  Assemble pickles, avocado and cheese on one side of the prosciutto and roll it up.  Enjoy!

Advertisement

Sesame seed encrusted Salmon salad with Creamy Sesame Ginger Vinaigrette

Since getting a new grill for my birthday, Mike and I have been grilling something or other almost every single night! This salad is quick, easy, and incredibly delicious!  Start to finish, it takes me less than 20 minutes to create and has become a go-to in our house for weeknight meals.  The Sesame Ginger Vinaigrette is delicious and I usually make extra to carry with me in my purse for lunches out.

Sesame seed encrusted salmon

Sesame Ginger Vinaigrette: Ingredients

1/2 cup olive oil

1 TBS toasted sesame seed oil

1 clove garlic

1 inch knob fresh ginger

2 TBS coconut aminos

2 TBS rice vinegar

1 tsp honey

1/4 tsp prepared mustard

S/P to taste

Directions:

1.) Place all ingredients into a container and blend.  I find that my immersion blender whips up the creamiest version of this vinaigrette that won’t separate.  For a more traditional vinaigrette, grate ginger and mince garlic and then emulsify.

Sesame seed encrusted Salmon salad: Ingredients

1/4 cup sesame seeds

2 tsp red pepper flakes

1/4 tsp salt

1/4 tsp pepper

6 cups mixed greens

2 large carrots

1 ounce shaved romano cheese

2 (6 ounce) wild salmon fillets

Directions:

1.) Pre-heat grill on medium heat.

2.) Mix greens with shaved carrots.  Shave romano cheese over the top of the salad.  Set aside.

3.) Mix sesame seeds, s/p. and red pepper flakes.  Coat salmon fillets with mixture.

4.) Grill on both sides for 5 minutes.  Depending on how hot your grill gets, it should be medium rare in the middle.

5.) Serve on top of salad and enjoy!

Asparagus Breakfast Skillet

Breakfast has been a bit of a challenge on the Auto Immune Protocol. Luckily, I happened upon this delicious veggie skillet and have been eating it like a fiend! It’s really flavorful and still tastes like breakfast. Pair it with a banana and coconut milk whipped cream and you’re in business!

image

Ingredients:
5-6 small to medium asparagus stocks
3 pieces of bacon
1 cup shredded golden beet
1 tablespoon coconut oil
Salt (and pepper if you can have it) to taste

Directions:
1. Wash, chop, and shred veggies. Cut bacon into bite sized pieces.
2. Heat coconut oil over medium heat in a medium sized skillet for about 2 minutes and then add beets. Cover with lid and cook for about 5 minutes.
3. The beets should be getting brown on the bottom. Flip them with your spatula and add the asparagus to your skillet. Cover again for 3 minutes.
4. Remove cover and use spatula to shift beets if they are starting to burn. Add bacon. Don’t cover but continue to shift them around occasionally, checking frequently to prevent burning. Cook for about 5 minutes and remove from heat.
5. Salt and pepper if desired. Enjoy!

image

Chicken and squash soup

I’ve been battling a mild flare for the last couple months. It’s frustrating and discouraging after two years of being virtually flare free to be struggling again. Luckily it’s relatively small, at least compared to previous flares, and doesn’t seem to be getting worse. One step I’ve taken this past month is to try the paleo auto immune protocol. It’s designed to eliminate common irritants and has a whole science of its own, but suffice it to say, this month in addition to the rest of the food I don’t eat, I’ve added nuts, seeds and seed based spices, nightshades, dairy and eggs. Ugh.

I kind of hate it but I keep reminding myself that it’s not forever, that healing comes first, and that it’s a privilege to live in a country where it is possible to make these kind of choices for myself. One food that we’ve been eating fairly regularly, as in multiple times a week, is this simple soup. I buy a whole chicken every week, roast it, and use half the chicken to make this and the bones to make bone broth.

image

We love it. It’s simple, rich and filling. Perfect for the AIP. My biggest fans have actually been my in laws who are about as far from being paleo as humanly possible.

Ingredients:
The meat from a roasted chicken, about 3 cups
2 large carrots, chopped
2 cups cubed butternut squash
1 cup acorn squash (about 1/2 squash)
2 cups spinach
2 cups bone broth
2 cups water
Salt and pepper, or simply salt

Directions:
1. Add chicken, carrots, butternut squash, bone broth and water to a pot and bring to a boil. Adjust heat and simmer for 20 minutes.
2. Roast or microwave acorn squash (40 minutes in the oven at 375 or 6 minutes in the microwave). Once cooked, add to pot.
3. Chop or tear spinach. Add after 20 minutes and simmer for an additional 5.  Remove from heat and add salt.
4. Serve and enjoy!

For more information about the auto immune protocol, I recommend reading The Paleo Approach by Dr. Sarah Ballantyne.

Strawberry Shortcake with Coconut Flour

Once again, it’s been a long time since I’ve posted but I wanted to post some pictures of the incredible grain-free Strawberry Shortcake that I made for my birthday!  I used the recipe last July for some patriotic triffle and was excited to see that Jenni, over at the Urban Poser, had made it into a cake as well.
IMG_20140401_113321
It was incredible and does not taste grain-free at all.  It’s dense, like a lot of coconut flour recipes, but very moist, sweet and the coconut whip cream gives it a sort of airiness.

I used 9 inch pans so my creation did not turn out as ethereal and lovely as Jenni’s but it was mouthwateringly delicious and a definite crowd pleaser.  Find the recipe and instructions here!

The Best SCD/Paleo Chili you have ever tasted!

This delicious savory, spicy and sweet chili is the culmination of over a year of fairly tragic SCD legal chilis.  No really.  Everyone send Mike an air-five for being a champ and eating burned, bland, s0-hot-your-nose runs, oh and did I mention bland, chilis.  However, by painstaking trial and error, I have created the BEST chili recipe!  It reminds me of Fresh Fields chili, if anyone remembers the tiny yet incredible diner, in tiny yet incredible Stillwater, Minnesota.   Hands down, this is the best SCD/Paleo chili I have tried.  I started with this recipe from Paleo Pot and it evolved from there.  Credit where credit is due, the Paleo Pot recipe was great but not sweet or substantial enough for an entire meal.

So far we have served it a bunch of ways- plain, over spaghetti squash, over cauli-rice, with Roost Blog’s Almond Thyme Crackers, with onion and avocado, with cheese, etc.  Try it out and let me know any fun new combos!

IMG_2134

Sweet and Spicy SCD/Paleo Chili Recipe:
2 Bell Peppers (1 Orange, 1 Yellow is my favorite)
1 Red Onion
1 Yellow Onion
1 Jalapeno pepper (Leave half of the seeds in or adjust according to heat preference)
1 lb. Ground pork
1 lb. Ground sirloin
1/4-1/2lb. bacon
4 cups diced tomatoes
1/2 head of garlic (5-6 cloves)
1 TBS Cumin
1 TBS Cayenne Pepper
1 TBS cocoa (optional- remove to make SCD legal)
1 TBS salt
1 tsp black pepper
1 tsp red chili flakes
1/4 cup honey
1 cup red kidney beans (pre-soaked according to SCD specifications)
1 cup water
Instructions:
1.) Heat oven to 425 degrees.  Line a cookie sheet with parchment paper and place bacon strips evenly.  Cook for 9-12 minutes until finished cooking.  I love cooking bacon in the oven because it cooks evenly but feel free to cook in the skillet as well.
2.) Brown the pork and beef.  Strain the fat and set aside.
3.) Cook all of your veggies to roughly the same size.  It doesn’t have to be perfect because you’re going to put half of them in your food processor or blend after cooking.
4.) Combine the spices in a separate bowl.  Add all of the veggies, beans and meat to your crock pot.  Add the water, spices, and honey and cook on low for 8 hours.
5.) Remove the top and stir to combine.  Take roughly half of your mixture (about 5 cups) and blend it in your food processor.  Add the un-blended portion to the blended portion and stir to combine.
6.) Serve and enjoy!  We like it with avocados, served over spaghetti squash, with grated cheese on the top or just plain.  Yum!

Surviving February: Slow Cooker Pineapple and Chili Pulled Pork

February is hands down, the worst month of the year for mid-westerners.  It manages to simultaneously never end and speed by, giving the poor chump stuck in a mid-west induced haze of flu, stress, and blizzards, the feeling of slow motion whip lash.  You know it’s happening, but you can’t do anything about it.  Mid-westerners, we are the true survivors.

IMG_2081

Fortunately, February also gives me this frenzied craving for all things tropical.  I window shop for dresses without sleeves and blush inducing lengths.  At work, I keep my sanity while holding on the phone by clicking on EVERY SINGLE travel “get-away” package that I see.  And I make a series of tropical inspired dishes that give me the illusory feeling of controlling my own destiny.  Maybe if I eat enough pineapple. I too will win Travelocity’s “Romantic Caribbean Get-Away” sweepstakes.

It hasn’t happened.  But March is here.  It’s sunny today and I am happy to post pictures of mouthwatering Caribbean spiced pork turned mid-western by virtue of the crock-pot.  I snagged the recipe off of paleopot.com and was glad I did.  The sweetness of the pineapple and the heat from the chilies made me ignore the blizzard outside.  I was so absorbed in the meal I didn’t even notice the snow plow, dutifully stacking snow around my little Vibe, making it impossible to leave.

Maybe getting stuck inside isn't such a bad thing after all...

Maybe getting stuck inside isn’t such a bad thing after all…

Paleo Double Chocolate Donuts

IMG_2077

About 3 weeks ago we celebrated my husband Mikey’s 32nd birthday!  The way I grew up, birthdays are not confined to a solitary party or a nice cake and presents.  Rather, a birthday is an event stretching anywhere from 24-72 hours in which the sole focus of everyone’s attention is celebrating the awesomeness that is you.  My mom even made all of us girls separate tablecloths, used only on our birthdays.  Mine was a spangely magenta masterpiece, while my younger sister favored a light pink velour table runner.  Nice work Mom.
Anyway, I was determined that Mikey was going to have the best birthday EVER despite my raging flu, his three hour night class, and all day meetings.  The morning of, I got up early and drove to get his all-time favorite breakfast: donuts from Dunkin’ Donuts.  I pulled through the drive through and leaned out my window into the frigid mid-western morning and said “Hi, I’m grabbing donuts for my husband’s birthday.  Do you have one double chocolate and one peanut cluster?”  “Sure do”, came the automatic reply.  “Will that be all?  Or can I get you one as well?”
Yes.  Yes I will have a light, fluffy, yeasty chocolate donut with Bavarian cream.  Or a thick, dense powdered sugar donut that leaves my lips frosted with a delectable white ring.  Or a few coy, round donut holes, the bane of the dieters existence but ever dear to my own heart.
“No.”  I replied regretfully.  “That’s all.”
Mike’s birthday passed but I haven’t been able to get the vision of those donuts out of my head!  Finally I decided to get serious, and get a darn donut!  This is my favorite variation of different recipes I have tried to get the perfect double chocolate, paleo friendly donut.
Ingredients: (Donut)

  • 1 cup almond flour
  • ¼ cup cacao powder
  • ¾ tsp baking soda
  • 2 TBS honey
  • 3 eggs
  • 1 TBS strongly brewed coffee
  • ¼ cup melted coconut oil

Instructions:

  1. Pre-heat oven to 350 degrees.  Grease the donut pan very well with coconut oil or oil of choice.
  2. Combine all of the dry ingredients and sift to combine.  Make sure to use 100% unsweetened cacoa powder.
  3. Combine wet ingredients except for the eggs and stir to combine.  Add eggs and beat until well combined.  You should be able to pour into molds.  If it is too sticky, add a little bit of water.
  4. Pour into donut mold until 2/3 full.  Bake for 10 minutes, no longer.  Remove from molds while warm.

Ingredients: (Frosting)

  • ¼ cup coconut oil
  • ¼ cup honey
  • 3 ounces unsweetened cacao in bar form
  • ½ tsp vanilla extract

Instructions:

  1. Heat oil in sauce pan over medium heat until melted.
  2. Add cacao and stir constantly, making sure it doesn’t burn.  Adjust heat as needed.
  3. Add honey and whisk to combine.
  4. Remove sauce pan from heat and add vanilla extract.  Stir well.
  5. Cool to slightly warm.  Dip donuts into chocolate and then let cool.  The frosting will slightly harden as it cools.  Best when slightly warm.
Dunkin' Donuts ain't got nothin' on me!

Dunkin’ Donuts ain’t got nothin’ on me!


Homemade Mayo and the glory that ensues

This is the part of the story where the hero decides that enough is enough and it’s time to kick some butt!  If you like that part of the story, read on.  Disclaimer, I am the hero in this story.  Well, me and my kitchen aid mixer but that’s a given.

When I started the Specific Carbohydrates Diet back  in May 2012, I was used to eating lots of creamy, delicious dressings and spreads and I was determined that changing my diet wouldn’t change that.  This was illogical for a number of reasons, the biggest being that I was brand new to this kind of cooking and pretty unconfident in the kitchen.  Still, two weeks in I decided to try a ranch dressing that called for 1/2 a cup of mayo.  The result was a running, eggy tasting mess and a sugar-withdrawal, prednisone induced cry.  About a month and a half later I tried a garlic aioli.  Aioli is mayo made with olive oil.  The running, non-cohesive result led me to the conclusion that mayo was not in my wheelhouse and that I should stick to apple cider vinaigrette.

This February, a promotion at work has left me scrambling for time to cook.  I think I have been more of less living off of almond thyme crackers and cheese.  And, the salad bar at Whole Foods where the most delicious tuna salad in the whole world gave me the courage to try again.  Here is how I did it.

Ingredients:                                                                              

Lenten Celebration.

Tuna Salad

  • 2 large egg yolks
  • 2 tablespoons fresh lemon juice
  • 2 tablespoons water
  • 1/2 teaspoon honey
  • 1 teaspoon dry mustard
  • 1 teaspoon salt
  • Pinch of cayenne (optional)
  • 1 cup canola oil*

Instructions:

  1. I separated the egg yolks from the whites.  I froze the egg whites for use later.  To the egg yolks I added the lemon juice, water and honey and carefully whisked in a small porcelain bowl.
  2. I used my sauce pan to heat about 3 cups of hot water until it was simmering.  I placed the porcelain bowl with the egg mixture into the sauce pan.  From here, I whisked the egg mixture constantly, heating until the egg mixture reached 135 degrees, measured with a candy thermometer.  Also, around 130 it started to thicken.  From here, I removed it from the heat and dipped the bottom in cold water to stop it from cooking and let it sit for 5 minutes to cool.  I think it’s pretty important to temper the eggs.  At 135, it will kill any bacteria present.
  3. I transferred the egg mixture to my kitchen aid mixture and started to whisk at a slow speed.  From here, I added the mustard, salt and cayenne.
  4. Now comes the tricky part.  Increasing the speed of the mixer, I slowly, almost drop by drop, added the oil down the side into the egg mixture.  The egg mixture has to “hold” the oil and so it needs to be slow.  Continue until the oil is gone.
  5. Refrigerate for 5-10 minutes until cold.  And you’ve got some homemade mayo!

*I know there is a lot of debate in the SCD community about canola oil and its safety.  If you have concerns, feel free to substitute peanut oil or olive oil.

So creamy!  So fluffy!  So delicious!  And best of all, it enabled some truly awesome meals this week!  First out much further ado:

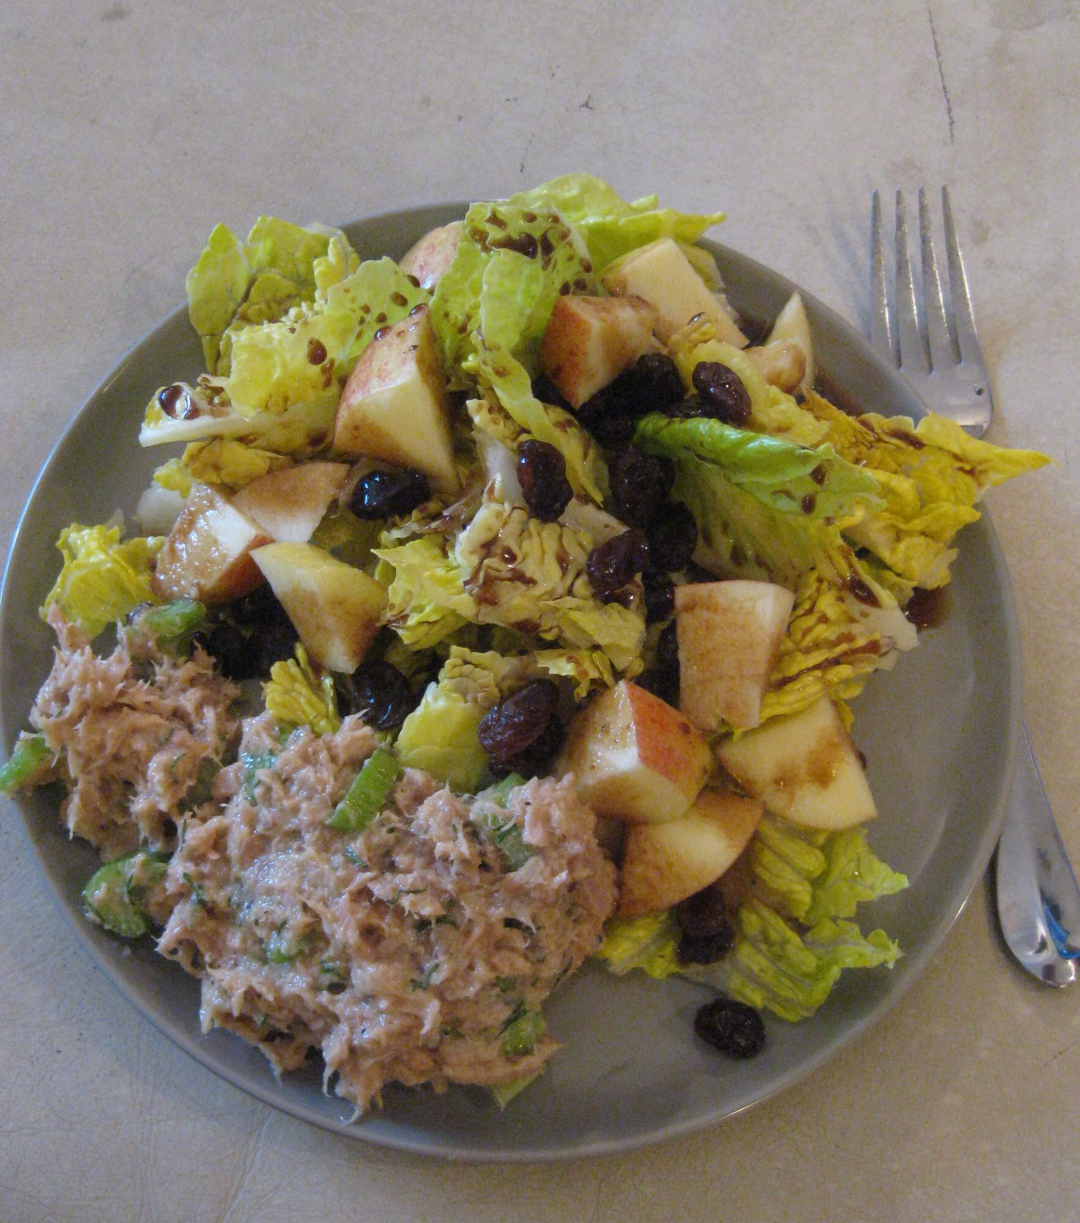
Tuna Salad Ingredients:

  • 2 cans of tuna, packed in water with nothing added
  • 4 T. diced celery
  • 5 T. high quality mayonnaise
  • 2 T. Dijon or other good mustard
  • 1-2 t. finely chopped dill
  • 1 T. honey
  • 1/4 t. cayenne (optional)
  • Salt and pepper to taste

Instructions:

1.  So simple.  Just mix it up and chill.  Serve with lettuce, on a sandwich or by itself!  Yum!

I followed 101 Cookbooks recipe for Egg Salad and served it with Almond Flour and Thyme Crackers.  It was great!  I would have loved it on cashew bread as well.

IMG_2054

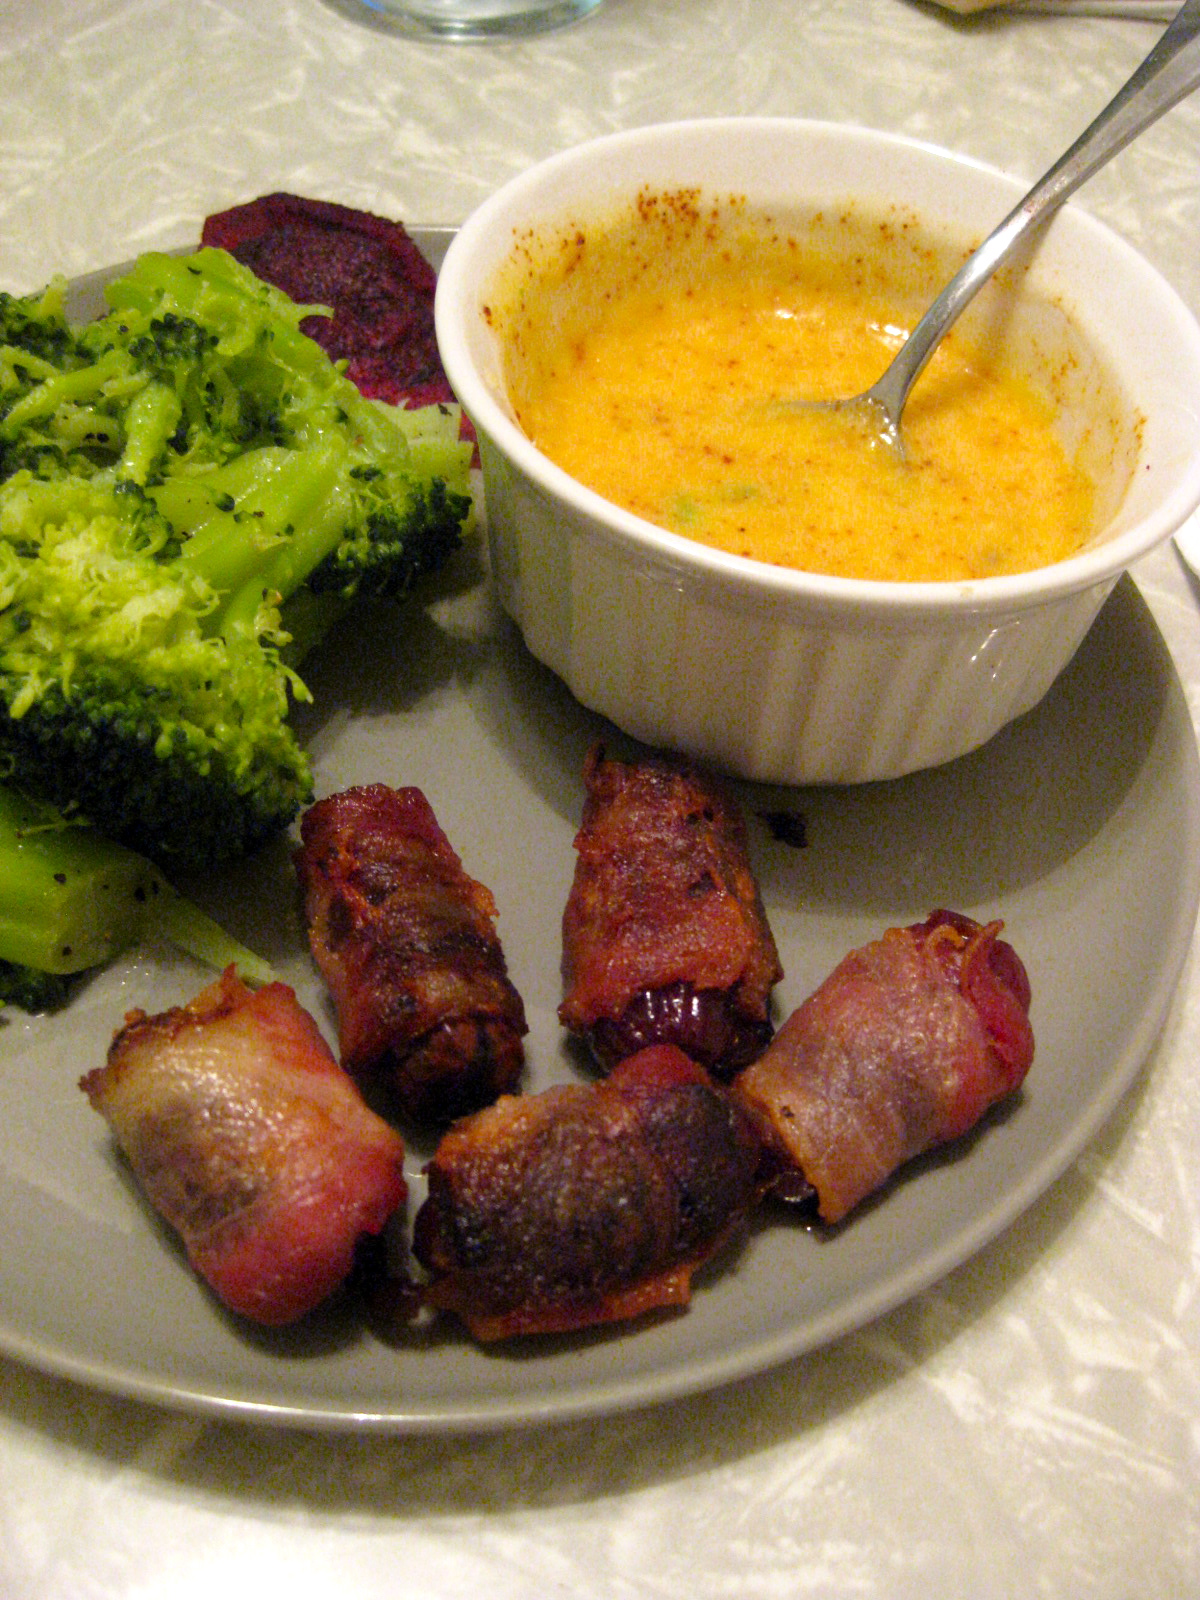
Bacon Wrapped Dates and Chipotle Mayo Ingredients:               

This little piggy had bacon wrapped dates

This little piggy had bacon wrapped dates

  • 1/4 cup mayo
  • 1/4 t. chipotle chili mayo
  • 1 T. lemon
  • 2 t. finely diced jalapeno pepper
  • 1 small clove of garlic, minced
  • Salt and Pepper to taste
  • 5 strips bacon
  • 10 medjool dates

Instructions:

1. Blend all mayo ingredients together and chill.  Delicious!

2. Cut 5 strips of bacon in half.  Wrap ten medjool dates in the bacon and cook for 30 minutes at 350 degrees.

To conclude.  The hero succeeded and was not defeated by soul-less food and made many delicious dishes and lived happily ever after.  The End.

Butternut Squash Lasagna

Butternut squash lasagna isn’t terribly original.  In fact I’m pretty sure I’ve seen Rachel Ray do it, which means I usually pass but in this case I decided I’d give it a go.  Every gluten-free, paleo, low-carb blogger seems to have their own recipe.  I wanted to try and incorporate some signature “SCD” foods into mine, such as my homemade goat milk yogurt and favorite store bought (but still SCD legal) marinara.

I was really happy with the result!  It was hearty and the squash “noodles” held up very well.  Mike and I both agreed that similar to pasta lasagna, it actually tasted better re-heated!  I’ll definitely be making this again soon!

Butternut Squash Lasagna

Butternut Squash Lasagna

Butternut Squash Lasagna– cook in 10.5 by 7.5 inch pan

 Ingredients:

  • 1 medium butternut squash (Try to get one with a long “neck”)
  • ½ cup SCD Yogurt (Goat milk yogurt is my favorite for this recipe)
  • ½ lb. ground beef
  • 2 cups shredded cheese (I like havarti, aged cheddar, and goat cheddar)
  • 1 TBS basil
  • 2 tsp oregano
  • 2 tsp thyme
  • 2 tsp garlic powder
  • 1 tsp onion powder
  • ¾ tsp salt
  • ½ tsp ground black pepper
  • ¼ tsp chili powder
  • 2 cups SCD legal marinara sauce (I use Lucini)
  • 2 TBS coconut oil

 Instructions:

    1. Pre-heat oven to 400 degrees.  Place squash in oven for 10 minutes to soften before removing.  Continue to heat oven.
    2. Mix together all spices.  This will make about 4 TBS of spice.
    3. Combine ground beef with 1 TBS of spice mixture.  Mix well, using hand to combine if necessary.
    4. Heat 1 TBS of coconut oil in a 10-inch skillet.  When hot, add ground beef and brown, stirring to prevent burning.  Decrease heat to medium to avoid burning if necessary.  Once it has finished cooking, drain oil and fat.  Keep warm.
    5. Remove squash from oven.  Use mandolin to slice squash into long pieces, approximately ¼ inch thick and 4-5 inches long.  If you don’t have a mandolin slicer, use knife to slice thinly.  You will need enough slices to create 3 layers of “pasta”.  How many slices you need will vary, depending on the size of your squash.
    6. Use the second TBS of coconut oil to coat the bottom of your pan, so that the first layer of “pasta” does not stick to the bottom.
    7. Assemble your lasagna!
      • First a layer of butternut squash
      • Next, spread a thin layer of yogurt followed by a layer of cheese
      • Sprinkle 2 tsp of your spice mixture
      • Add a portion of the ground beef
      • Top with about ¾ cup marinara
      • Repeat!
      • After you have three layers of squash, conclude with adding a final layer of cheese after the marinara
    8. Bake in oven at 400 degrees for 35-40 minutes.  Serve while hot or refrigerate and re-heat.  The advantage of refrigerating and reheating is the squash will have absorbed more of the marinara, making it less saucy and more like lasagna.  Delicious either way!